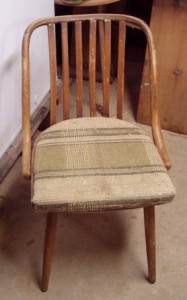
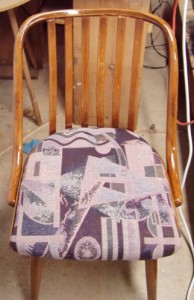
 Now, just as a reminder – it’s always good to look at where we start to see the difference from where we ended up – I started with four of these: Old bent-wood kitchen chairs that I had inherited many years ago. A lot of the finish had been rubbed off the backs; there was a certain amount of small repairs that had to be done on the spindles (thank you, wood putty), the seats needed to be completely redone with new foam and fabric and so on. To review what I did, see these:
Pull up a chair
Pull up a chair – part 2
Once I got the seats all done (and frankly, once you have all the foam and fabric pieces cut out, doing all the seats at one time is less than an hour), then it was back to the frames. The DH had really done all the heavy lifting on the repairs. The spindles in the backs had all popped out of their holes at the underside of the top of the back and he repaired that by frankly shoveling into the holes a whole lot of wood glue and wood putty, jamming the spindles back into the holes and then using rope wound around the seat and over the top of the back as a primitive sort of clamp to hold the spindles into the holes while everything dried and set. Then I took a craft knife and chipped off anything that squeezed out of the holes.
When you have a project like this, there is a point (hopefully fairly close to the beginning before you are too far down the road) where you have to evaluate the possibilities of where you are going to end up with the piece. Some pieces are worth stripping by hand, sanding with several grades of sand paper, staining and finishing by hand, waxing and so on. Aunt Toby’s mama used to put that sort of work into the diningroom table. That lasted for years. If you are building something from scratch, that is the sort of effort you want to put in. It is definitely worth it.
These chairs are NOT that sort of project.
They were beaten up when I inherited them and our family put a good 25 years of abuse into them and they’ve been hanging in the rafters of the basement ever since. Their next stop is at my son’s new place until he gets old enough and so on to decide to go out and get himself a diningroom table and chairs. The bent wood on the backs in several of the chairs is cracked and is in awkward places to repair. This is, to put it bluntly, a cosmetic repair job. If I sent them off to be tank-dipped to get all the finish off, they would probably have been damaged further. The wood certainly would have swelled up. Stripping something like this by hand would have been far more work than it was worth.
 So, I punted. I admit it. I did a quick and dirty job. There is such a thing (believe it or not) as ‘good enough’ and in this case here is what I did:
1) Sanded the chairs with 220 grit sandpaper to get off the odd bits of finish and smooth down the surface. Rubbed the chairs off with a clean damp rag to get all the dust and sanding dust off. Allowed them to dry for 24 hours.
2) Painted them with this product. Polyshades Dried the chairs for 24 hours, lightly sanded, wiped off the sanding and painted again.
Now, Polyshades(tm) is a poly-urethane based product – that is, the stain is suspended in the poly, which makes it a little bit tricky. Minwax(tm) markets this as an easy one-step finish and theoretically, it IS, but it is still tricky:
1) I used a foam brush (Aunt Toby is very fond of foam brushes – they make for very easy clean up because frankly, they are cheap and you just wrap them up and throw them away). The tricky part about using a foam brush? Well two parts, actually – first, it is easy to get over enthusiastic and load up the brush and end up with drips and runs on the vertical surfaces (and chairs have a LOT of vertical surfaces). The second thing is that it is the nature of foam brushes to create bubbles (because they are basically soft sponges on the end of a stick). If you apply a finish with bubbles in it, it will dry with bubbles in it and it does not look nice. To use a foam brush with this product you need to be very delicate – not push or squeeze the brush onto the surfaces. There is plenty of finish in the foam – just stroke it on and keep an eye on it. It looks wet when you put it on – you’ll know if you have not put down enough finish and you can go over that area again. If, after you’ve allowed the finish to dry, you find drips or runs, use a single-blade razor blade to shave those off and sand lightly with either fine sandpaper or fine steel wool, rub it with a damp cloth and lightly stroke on another coat to even it out.
2) Poly-based finishes dry from the outside in, so atmospheric conditions like humidity and temperature become very important. The hotter and more humid the weather is, the longer you need for it to dry – the can says six hours between coats. I allowed 24 since the weather here was hot and humid. I did all of this work, frankly, out in the driveway with the chairs on newspaper. You can get finishes which are low VOCs, but doing it outdoors is an extra step that I like to take. Reminder: this sort of stuff does not work well in temperatures under 55 degrees F. This is a job to be done in the spring, summer or early fall. I would not do this in the winter in the basement, even with ventilation.
3) Don’t shake the can before you open it – pick up a stirring stick when you buy it at the paint store. Poly-urethane finishes will end up filled with bubbles if you shake the can. Just open the can and stir it up thoroughly. That will be enough.
4) One thing I did not take into account is that with the addition of the new foam, the front edge of the seat would be farther away from the edge of the chair itself, which meant that the original screws, which are 1.5″ long are no longer long enough to get into the seat itself to hold it to the frame of the chair. So I had to replace those with 2″ screws.
So, there you go. From a skills aspect, this furniture project is really very simple:
Minor repairs on the frame.
Redo the upholstery on the seats
Sand and put new finish on the frame
Attach the seat to the frame with the screws
You can do this.
